Call today! 704-536-6667
Paint Protection Film, PPF, also known as a clear bra, is a transparent urethane layer applied to your vehicle’s painted surfaces to protect against everyday damage.
It acts as a physical barrier against hazards like rock chips, road debris, bug splatter, stains, and UV exposure. Many premium brands, such as XPEL, offer advanced films with self-healing properties and UV resistance.
With proper installation and maintenance, high-quality PPF can last 5 to 10 years, making it one of the most effective long-term solutions for preserving paint condition and resale value.
Yes, on the right panels. DIY PPF installation is realistic for flat or low-complexity surfaces. It becomes significantly more difficult on panels with compound curves, tight edges, or integrated components.
Using the wrong tools is one of the fastest ways to ruin a PPF install. Unlike basic car detailing, PPF installation requires specific tools to control pressure, heat, and alignment precisely.
| Tool | Purpose |
|---|---|
| Steel tape measure | Precision measurement before cutting |
| Squeegee (multiple hardness levels) | Removes water and air during application |
| Heat gun (approx. 225°F / 107°C) | Stretches film around curves and seals edges; follow film manufacturer guidance for temperature settings |
| Steamer | Safer than a heat gun for removal and adhesive softening |
| Air release pen | Fixes trapped air pockets after application |
| Plastic razor blade | Lifts film edges without scratching paint |
| Microfiber towels | At least 2 to 3 per panel – lint-free essential |
| Isopropyl alcohol (IPA) | Final surface cleaning and tack solution component |
| Distilled water | Prevents mineral spots during application |
| Clay bar | Removes embedded surface contaminants |
| Paint polisher | Corrects swirl marks before film application |
Do not substitute household cleaning products for IPA or distilled water. Tap water contains minerals that leave deposits under the film. Standard glass cleaners contain ammonia, which degrades PPF adhesive.
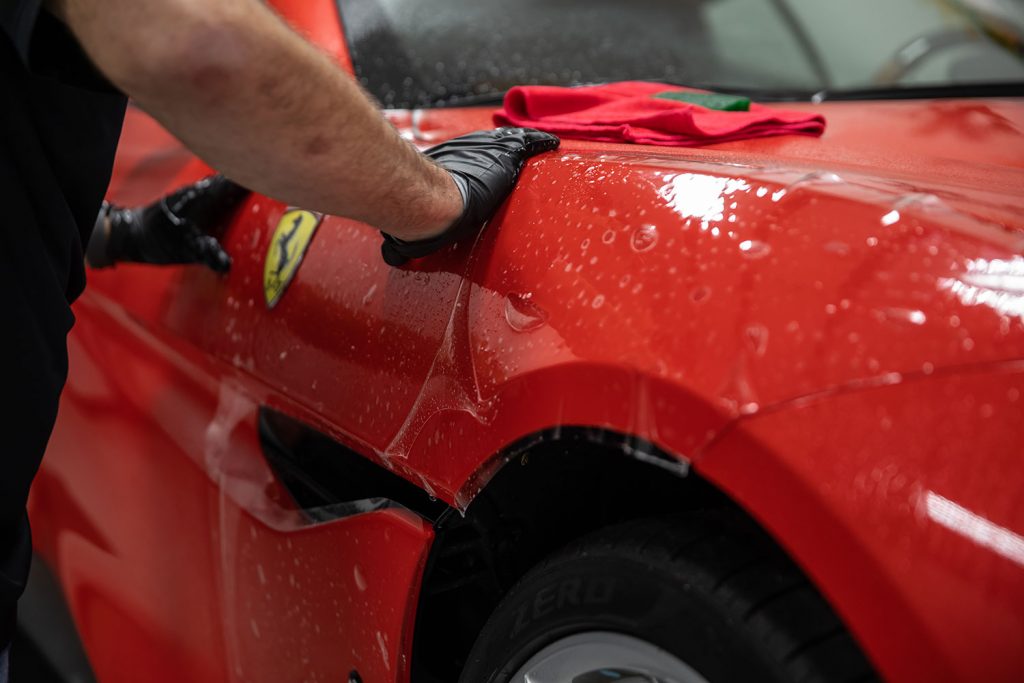
Surface preparation is where most DIY installs succeed or fail. Professionals allocate as much time to prep as to the installation itself – sometimes more.
Start with a foam pre-soak to loosen surface contaminants, followed by a two-bucket hand wash. Rinse thoroughly with distilled water. Do not use automatic car washes before PPF installation – brushes introduce fine scratches that will be locked under the film.
Clay bar treatment removes embedded contaminants that washing cannot reach – industrial fallout, tar spots, tree sap residue, and brake dust. Work methodically across the panel until the surface feels completely smooth to the touch. A hood typically takes 10 to 15 minutes of clay bar work to reach the required level of cleanliness.
PPF does not hide existing paint defects; it preserves them permanently under the film. Any swirl marks, light scratches, or oxidation present at the time of installation will be visible under the film for the life of the product. Correct these issues with a machine polisher before installation.
Wipe the panel with an IPA and distilled water mix – typically 1 part IPA to 3 parts distilled water – to remove all oils, polish residue, and fingerprints. Allow the panel to fully dry before proceeding.
Two spray solutions are used at different stages of PPF installation. Understanding when and how to use each is critical.
Slip solution allows you to reposition the film after it contacts the panel surface. Without it, the adhesive grabs immediately, and repositioning becomes extremely difficult.
Tack solution removes the slip and allows the adhesive to begin bonding. It is used to lock edges in place and during the final squeegee pass.
One of the biggest factors that determines how difficult PPF installation will be is the type of film you use – pre-cut kits or bulk film.
| Option | Best For | Difficulty | Notes |
|---|---|---|---|
| Pre-cut kits | DIY installers | Lower | Pre-shaped for specific vehicles, easier alignment |
| Bulk film | Professionals | High | Requires hand cutting, higher risk of mistakes |
For beginners, pre-cut kits are strongly recommended. Bulk film is typically used by experienced installers who are comfortable with precision cutting and complex panel shapes.
Use flat palm stretching to encourage the film to conform to compound curves before applying squeegee pressure. Avoid pulling the film aggressively – excessive tension creates thin spots in the film and stress lines that become visible over time.
Mirrors require relief cuts – small cuts into the film that allow it to wrap around angles without bunching. Most mirrors need 2 to 3 small relief cuts to sit properly. Plan cut placement before applying the film – improvised cuts through film that is already bonding are difficult to control.
Headlight film is a different material from body panel PPF, typically thinner and optically optimized for lens clarity. Pre-cut kits for headlights are strongly recommended over bulk film for DIY installers.
Work in a clean, dust-free environment. Garages are preferable to driveways – even a light breeze can carry debris onto a wet panel mid-installation.
Inspect the panel under bright lighting, ideally with a work light held at a low angle. Any remaining contamination, dust, or polish residue should be removed before proceeding.
Spray slip solution generously across the panel surface and on the adhesive side of the film. The surface should be visibly wet.
Place the film on the panel and use one hand to maintain control while aligning edges. The slip solution gives you time to adjust.
Confirm center alignment first before committing edges. A panel that looks aligned at the edges but is off-center will show gaps or overhang that are difficult to correct without pulling the film.
Work from the center outward using overlapping strokes at approximately 70% overlap. Apply firm, consistent pressure to push out water and air. Do not squeegee toward the center; always work toward the edges.
Apply short bursts of heat at a low, consistent temperature to help the film conform to curved areas. Keep the heat gun moving; holding it stationary causes distortion. The film should stretch and conform smoothly; if it resists, apply more heat rather than more force.
Lightly spray tack solution along the edges and squeegee again. This removes the slip and begins the bonding process at the edges where lifting is most likely to occur.
Off-car trimming, cutting the film before application using a template, produces cleaner results than on-car cutting. If on-car cuts are necessary, use a fresh blade and shallow relief cuts rather than straight cuts through curves.
The cap sheet protects the film surface during handling. Remove it according to the manufacturer’s timing guidance. Some films require immediate cap sheet removal after application, while others benefit from a short wait.
Use an air release pen to penetrate trapped air pockets, then re-squeegee the area. Small pockets that are difficult to reach will often resolve during curing.
Keep the vehicle dry for 24 to 72 hours after installation. Avoid rain if possible during this window. Small water bubbles or haze under the film are normal during curing and will disappear as the adhesive fully bonds.
| Mistake | Consequence |
|---|---|
| Insufficient surface cleaning | Trapped debris is permanently visible under the film |
| Too little slip solution | Film bonds before correct positioning |
| Overheating with a heat gun | Film distorts and loses optical clarity |
| Rushing edge sealing | Edges lift within weeks of installation |
| Working in a dusty environment | Contamination embedded in the adhesive |
| Skipping paint correction | Swirl marks and scratches are locked in permanently |
| Using tap water | Mineral deposits visible under film after curing |
The most common pattern in failed DIY PPF installs is rushing. The process requires patience at every stage – prep, positioning, squeegeeing, and edge work. Speed consistently produces worse results than methodical technique.
Use an air release pen to puncture the bubble, then re-squeegee from the puncture point outward. Small residual bubbles during curing typically resolve on their own within 24 to 48 hours.
If debris becomes trapped under the film during installation, lift the nearest edge carefully using a plastic razor blade, remove the particle, and reapply. Act quickly – the longer the adhesive bonds, the more difficult edge lifting becomes.
Use a steamer to warm the film and soften the adhesive before peeling. Peel at a 45-degree angle, pulling back on itself rather than away from the panel. Do not peel cold film – it tears and leaves adhesive residue that is difficult to remove.
Clean remaining adhesive with IPA or a dedicated adhesive remover. Test any product in an inconspicuous area first – some adhesive removers can affect paint finishes if left on too long.
| Factor | DIY | Professional |
|---|---|---|
| Cost | Lower upfront | Higher upfront |
| Difficulty | High – requires skill and practice | Low – handled by trained installers |
| Finish quality | Inconsistent – risk of bubbles and edge lifting | Consistent – smooth, precise finish |
| Installation time | 4 to 10+ hours per panel for beginners | 2 to 6 hours for full coverage |
| Durability | Lower if installation errors are present | Higher – optimized adhesion |
| Tools required | Must purchase all equipment | Included in service |
| Risk of mistakes | High on curves and edges | Low |
| Warranty | Typically none | Manufacturer and installer warranty |
| Best for | Simple flat panels | Full vehicle, bumpers, mirrors, complex curves |
DIY PPF appears cheaper at first – but the cost calculation changes when you factor in tool purchases, film waste from mistakes, and the cost of professional removal and reinstallation if the DIY attempt fails. A botched installation on a bumper can cost as much as a professional installation to repair.
For panels where DIY is realistic – hoods, flat door panels – the cost savings are genuine. For complex areas, the risk-adjusted cost of DIY is typically higher than professional installation.
Professional installation is the right choice in these situations:
An authorized installer uses XPEL DAP software to generate precise cutting patterns for your exact vehicle – eliminating the alignment guesswork and waste that makes DIY film cutting so difficult.
If you’ve followed this guide, you already know that PPF installation comes down to precision – not just tools. DIY works on simple panels, but bumpers, mirrors, and full front coverage require experience and controlled conditions to get right the first time. That’s where professional installation makes the difference, not just in appearance, but in durability, edge adhesion, and long-term performance.
Sun Stoppers Window Tinting in Charlotte provides professional XPEL paint protection film installation for vehicles across Charlotte, Ballantyne, SouthPark, Matthews, and Mint Hill. Every installation uses precision-cut XPEL patterns for a clean, accurate fit on your specific vehicle – and working with an authorized installer ensures proper application and full manufacturer warranty coverage.
Get your free quote today and have your PPF installed right the first time.
For flat panels like hoods and door panels, DIY installation can save meaningful money if you have the patience for proper prep and technique. For complex areas, such as bumpers, mirrors, and headlights, the difficulty level and risk of mistakes make professional installation more cost-effective for most drivers.
Surface preparation and edge work are where most DIY installs fail. Prep takes longer than most beginners expect, and edges are the first place lifting occurs if tack solution and squeegee technique are not executed correctly.
A hood installation takes 2 to 4 hours for a beginner with proper prep. A full vehicle DIY wrap can take multiple days spread across a weekend. Professional installers complete full coverage in 2 to 6 hours, depending on vehicle complexity.
DIY PPF installations typically carry no warranty. Manufacturer warranties on XPEL film require installation by an authorized XPEL installer. If the installation fails due to improper technique, the cost of removal and reinstallation falls entirely on the vehicle owner.
The film will preserve those defects permanently. PPF locks in the paint condition at the time of installation – it does not hide or correct existing paint damage. Correct all paint defects before applying film.
It is possible, but not recommended. Outdoor environments introduce airborne dust, pollen, and debris that contaminate the adhesive during application. A clean garage with closed doors is the minimum recommended environment for quality results.
Wait 24 to 72 hours before washing. Avoid high-pressure water directly on edges for the first week. Use pH-neutral car shampoo and hand washing during the first month to allow full adhesive curing.
PPF is a thick physical film that protects against rock chips, road debris, and UV damage. Ceramic coating is a thin chemical layer that enhances gloss and water repellency but provides minimal physical protection. Many drivers apply ceramic coating over PPF to combine both benefits.